
Because no developer should ever cowboy coding, it’s important to have a local development WordPress environment. Varying Vagrant Vagrants lets you create and remove testing WordPress sites on local machine with ease.

Cowboy Coding
Learn more about why you should have a development envirement. Watch Tom McFarlin‘s talk on The Truth About the Environment at WordCamp Atlanta 2016.
What is Varying Vagrant Vagrants?
The primary goal of Varying Vagrant Vagrants (VVV) is to provide an approachable development environment with a modern server configuration. VVV is ideal for developing themes and plugins as well as for contributing to WordPress core.
— VVV Readme
Being said, VVV is a WordPress development environment on your local computer, including:
- Ubuntu
- Nginx
- MySQL
- PHP-Fpm
- PHPUnit
- Mailcatcher
- Git
- WP CLI
- xDebug
- Composer
- and a branch of different tools
Install Varying Vagrant Vagrants
1. Vagrant and VirtualBox
Easiest way to install vagrant and virtual box is using homebrew cask.
First, make sure you have homebrew installed correctly.
$ brew doctor
Your system is ready to brew.
Then, install homebrew cask, vagrant and virtual box.
$ brew tap caskroom/cask
$ brew cask install vagrant
$ brew cask install virtualbox
2. Install Vagrant Plugins
These vagrant plugins are optional, but they do make your life easier.
$ vagrant plugin install vagrant-hostsupdater
$ vagrant plugin install vagrant-triggers
$ vagrant plugin install vagrant-vbguest
3. Clone the VVV repo
We will install the VVV repo in ~/vagrant-local
. Change it if you must.
$ git clone git://github.com/Varying-Vagrant-Vagrants/VVV.git ~/vagrant-local
4. Booting Up the VM
$ cd ~/vagrant-local
$ vagrant up
Have a coffee break! The first time boot up needs to download the whole LEMP box plus tons of development tools come with VVV. It might takes 20 minutes to complete.
5. Start Coding!
Once $ vagrant up is done, you can start coding right away! Open http://vvv.dev/ and http://vvv.dev:1080 , you will find a dashboard containing several useful tools and the mailcatcher web interface.
Enhancing VVV
Let’s make our life even easier.
topdown/VVV-Dashboard
The default dashboard is ugly. Install VVV-Dashboard by topdown is not only prettier but more powerful.
$ cd ~/vagrant-local/www/default
$ git clone https://github.com/topdown/VVV-Dashboard.git dashboard
$ cp dashboard/dashboard-custom.php .
Go back to http://vvv.dev/ and appreciate the beauty of your new dashboard.
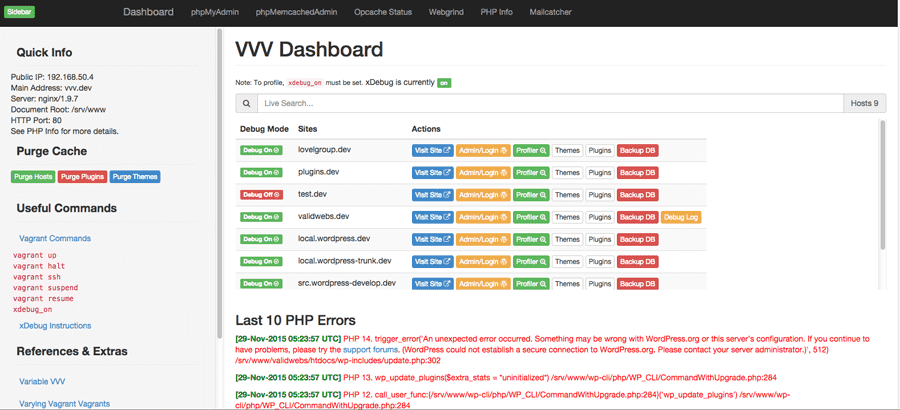
VVV Dashboard
Variable VVV
VVV creates a development environment for you. Variable VVV lets you manage WordPress site creation and deletion with ease.
Install Variable VVV
$ brew install bradp/vv/vv
Create a site
$ vv create
New VVV Site Setup
 Name of new site directory: my-new-wp-site
 Blueprint to use (leave blank for none or use sample):  Blueprint to use (leave blank for none or use sample):
 Domain to use (leave blank for my-new-wp-site.dev):
 WordPress version to install (leave blank for latest version or trunk for trunk/nightly version):
 Install as multisite? (y/N):
 Git repo to clone as wp-content (leave blank to skip):
 Local SQL file to import for database (leave blank to skip):
 Remove default themes and plugins? (y/N):
 Add sample content to site (y/N):
 Enable WP_DEBUG and WP_DEBUG_LOG (y/N):

About to perform the following:
* Halt Vagrant (if running)
* Create directory my-new-wp-site in /Users/me/vagrant-local/www
* Create files vvv-init.sh, wp-cli.yml, and vvv-hosts in directory my-new-wp-site
* Create file my-new-wp-site.conf in /Users/me/vagrant-local/config/nginx-config/sites
* Run <code>vagrant up --provision to initialize site Provisioning Vagrant will do the following: * Create database my-new-wp-site * Install WordPress (release version) in the htdocs directory * Make the site visible at my-new-wp-site.dev Continue (y/n)? :
With one single command $ vv create , Variable VVV asks you some basic config of the new WordPress site and then creates it for you.
Become lazier, Use Blueprints
You can use a json file to pre-define themes, plugins, widgets and menus. It works with multisite, must-use plugins, GitHub installer, etc. Checkout the blueprints section on the read me.
For Real, Start Coding on VVV!
Go to ~/vagrant-local/www/ and start coding some great!
Stay tuned. I will talk about staging environment for WordPress. Until then, take a look at: